Archive for category Photography
Which Bitmap Format Is Best?
Posted by baughdesign in Photography, Trends, Web on January 26, 2012
 Many screen capture or save from web commands are defaulting to saving image files in PNG format (portable network graphic). However, the PNG is not always the best format to use when populating a web page or sending an image file.
As an example, the image at left started out at 640 x 304 pixels at 100 dots per inch resolution. Presented as a JPEG ( Joint Photographic Experts Group ) image, the file size is 34KB. The same file, with no discernible difference in quality, stacks up at a whopping 250KB when saved as a PNG. This means that the JPEG loads seven times faster in a web browser … or can be sent seven times faster as an e-mail attachment.
The PNG was developed to supplant the GIF (graphics interchange format). The GIF format has been around since the earliest days of the web, and was often used to represent vector artwork, such as logos. The GIF also offered transparency … where the background of the image dropped out, allowing the page background to “butt-up” to the image, eliminating the square images often found in photographs. One main limitation of the GIF was that it was limited to 256 colors. The PNG went much further, in that it could accurately represent a full color spectrum.
 Let’s compare two pieces of artwork. The image on the left shows gradient artwork saved as a GIF. Because of the 256-color limitation, the image shows severe aliasing and speckling … where the color gamut of the original could not be achieved.
The second image shown is a PNG. Color reproduction is accurate, and there is no evidence of speckling. The improvement in quality of the PNG over the GIF comes at a surprising size reduction. The GIF file shown here is 36KB in size, while the higher quality PNG is only 32KB!
 When file size is important, whether it is to load a web page or quickly transmit an e-mail attachment, consider using a JPEG file rather than a PNG when the image is a photograph. If the image is artwork, the PNG is the hands-down winner over the GIF when it comes to quality and reduced size.
Images – The Rule Of Thirds
Posted by baughdesign in Photography on June 9, 2010
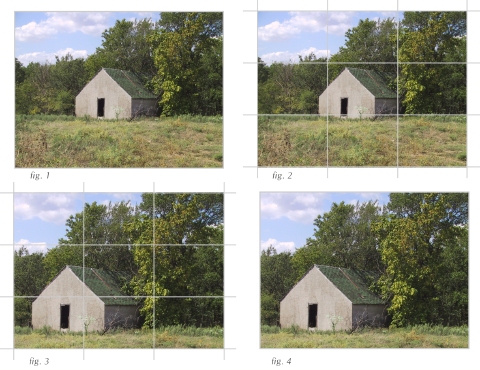 One of the most important aspects of good photography is the composition of the image, either in the viewfinder of the camera, or in the cropping and scaling of the image afterwards.
In this example, have taken an image (fig. 1) and shown what the eye is immediately drawn to, the outbuilding. However, the subject is fairly centered, which can make for an uninteresting composition.
In Figure 2, have overlaid a grid that breaks the image down into one-third squares.
Using the grid, I have rescaled the image, and placed the subject in an area that occupies either the northwest, northeast, southwest, or southeast two-thirds quadrant of the image area. In this example, have chosen the southwest quadrant (fig. 3). The final edit is displayed in Figure 4.
Comparing the images in figures 1 and 4, we now see that by moving the subject away from dead center, the overall image now shows greater “flow” and visual appeal.
Photographer’s Bible
Posted by baughdesign in Photography on October 12, 2009
 I’ve frequently taught a photo seminar each year at the Backroads Touring – Kansas ‘Flint Hills Stampede’, and it is a most enjoyable session, with up to a dozen budding photographers participating in the class. Beforehand, I’ve encouraged the photographers to study the work of Ansel Adams, as we’re most often engaged in landscape photography … and Adams has long been recognized as the master in this field.
When it comes to an overall reference publication, it’s hard to beat British photographer Tom Ang’s, “Digital Photographer’s Handbook”. For me, this was probably the best $35 I ever spent at the time … to quote DP Expert’s review: “Subjects covered include the technology of cameras and a how-to-choose guide. The essential physics of lenses and their behavior is explained. All aspects of the art are covered, including framing, composition, lighting and subject selection. The post-camera chapters describe all common editing techniques, including cropping, exposure correction, black and white conversion, colour correction, spot removal and other computer manipulations of images. Some of his advice on achieving weird effects is a little esoteric. Scanning, printing, web-sharing and emailing, as well as file storage are covered.
This is an ideal classroom-in-a-book for anyone who wants to progress beyond the point-and-shoot and print-at-Big W stage. Ang’s own photos illustrate the text well. The layout and the clarity of the text are excellent.”
Says it all for me …..!
Gallery Format
Posted by baughdesign in Layout Design, Photography, Web on October 10, 2009
 |
 |
 |
 |
 |
 |
 |
 |
 |
WordPress does not include a ‘table’ tool in its’ tool set, and I needed to show a uniform column and row thumbnail gallery grid within a post. Created a quick 3-row x 3-column table in my favorite web editor, set line depth, cell padding, and dimensions of table. Placed the HTML table code into the post, then uploaded and added individual images into each cell as a linked thumbnail, Thickbox activated.
Image File Management
Posted by baughdesign in Photography on October 10, 2009
 The digital camera has become an amazing everyday tool for many of us. I became interested in the technology in the early 90s … the Apple QuickTake 150 digital camera had arrived, one of the first consumer digital cameras. I started using the device to produce “on the fly” operator and user manuals, and no longer had to wait for film to be processed, then scanned. The time-saving utility of the digital camera was readily apparent to me. So too, was its’ disappointing lack of image quality. To my way of thinking back then, the digital camera would never approach the quality of film cameras.
Obviously, the digital camera did improve, and in ways never imaginable. My once essential OM-1 35mm SLR film camera now sits in permanent storage, while the digital variants are in daily use.
Digital image file management is sometimes an area that isn’t given much thought …. until the photographer gets a “Kodak Moment” frame … and later down the road, the image file isn’t up to snuff. If this has happened to you … here’s some pointers
• Set your camera to the largest file size and image quality. Storage media is inexpensive, and there’s false economy thinking you’ll double or triple the storage by going to a lower quality or resolution.
• After downloading your images, resist opening, viewing and editing the photo set. Instead, make a duplicate folder of the images and then open the copied image files. Place the originals on an inexpensive CD or DVD disk for archival purposes, or “lock” the files where they can no longer be altered.
If your camera has the ability to shoot in RAW mode, these last steps are not necessary, as the RAW (uncompressed) mode is not editable and must be converted to TIFF or JPEG first. Just save the RAW files as archives. However, most cameras, particularly the point & shoot variety, save the image file as a JPEG. The JPEG format employs what is known as “lossy” file compression in order to keep file sizes smaller. This means that data is thrown away with each save, causing a degradation of image quality each time the image is edited and saved.
Having an unaltered original image file may someday be worth its’ weight in gold ….
